Using schroot to have a stable and transplantable development environment

Over the last months I’ve been working in several projects, switched laptop and reinstalled my main distribution several times. Having to replicate the development environment one time after another and reinstall the compiler, tools, editor and all sorts of dependencies that stain a desktop distribution is a major nuisance. In the worst case, things won’t work as before due to incompatibilities of the new distribution. And what about bringing new developers to a complex project with a lot of dependencies which are difficult to track? The new team member can spend days trying to replicate the development environment of the rest of the team.

Fortunately, I learnt to use a tool that solves all these problems: schroot. Now I have one chroot for each of the main projects I work on. I can “transplant” it from one distribution or computer to the next, give it to a newcoming developer so that they can start hacking in the project in minutes, or just archive it when I’m not in the project anymore. It’s true that I’m spending more disk space with this approach but, from my point of view, the advantages are worth. Moreover, working in this way you start from a “bare” distribution and if your project build system is forgetting some dependency (because it “should” be on a desktop distribution) you will notice.

Making it work on a Debian based distribution is as easy as:

sudo apt-get install schroot

After that, you have to initialize the chroot(s) to use. Each chroot can be based on their own distribution. For instance, to create one chroot based on Ubuntu Quantal 64 bit to hack on webkit (so, named after it), you have to initialize it using debootstrap:

sudo debootstrap --arch amd64 quantal /srv/chroot/webkit http://archive.ubuntu.com/ubuntu/

Then you have to configure schroot to find it by editing /etc/schroot/schroot.conf and adding the new entry. There are a several flavours to configure chroots, but my favourite one is directory-based:

[webkit]
description=Quantal for compiling Webkit
type=directory
directory=/srv/chroot/webkit
users=enrique
groups=root
root-groups=root

If you want to have an independent home dir in the chroot, comment out the corresponding line in /etc/schroot/default/fstab (and probably in desktop/fstab too). If you’re going to use WebKit2, you need to enable (uncomment) shared memory support. The resulting fstab should look like this:

/proc           /proc           none    rw,bind         0       0
/sys            /sys            none    rw,bind         0       0
/dev            /dev            none    rw,bind         0       0
/dev/pts        /dev/pts        none    rw,bind         0       0
#/home          /home           none    rw,bind         0       0
/tmp            /tmp            none    rw,bind         0       0
#/run           /run            none    rw,bind         0       0
#/run/lock      /run/lock       none    rw,bind         0       0
/dev/shm        /dev/shm        none    rw,bind         0       0
/run/shm        /run/shm        none    rw,bind         0       0

Now, to enter in the chroot:

schroot -c webkit

Schroot has an automatic session management system that allows creating, reusing and killing sessions but which can be a bit uncomfortable at the begining. If you find yourself with a lot of zombie sessions, just kill them all:

schroot -e --all-sessions

As I’ve got tired of automatic and zombie sessions, now I use a tiny webkit.sh script in $HOME/bin to create, reuse and kill them on demand. Feel free to customize it for your needs if you find it useful.

For more info, here are the original sources I used to learn about schroot:

UPDATE: 2014-02-03

If you want to enjoy graphics acceleration (and probably other features), the chroot needs to have the same acceleration packages than the host. In my case (Nvidia card), I needed this in the chroot to avoid a big black rectangle while running Chromium/Blink:

apt-get install nvidia-319

UPDATE: 2015-01-08

If you want to use pulseaudio in the chroot, add these paths to /etc/schroot/default/fstab (my user is “enrique”, with UID 1000, use your owns):

/var/lib/dbus /var/lib/dbus none rw,bind 0 0
/home/enrique/.config/pulse /home/enrique/.config/pulse none rw,bind 0 0
# On other distros: /home/enrique/.pulse /home/enrique/.pulse none rw,bind 0 0
/run/user/1000 /run/user/1000 none rw,bind 0 0

From source code to ndk-build using autotools and androgenizer

This post explains how to compile C source code for Android using the Native Development Kit (NDK) by using autotools to set up the building infrastructure and using androgenizer to convert that autotools infrastructure into Android.mk files understood by the ndk-build tool. I’ll first review some autotools concepts very quickly trough examples and iterate over them.

Simple program

(Download the testapp.tgz example or browse it online)

We start from a simple helloworld program with its main() function that depends on a sayhello() function. We want to compile it using autotools in the simplest possible way.

To create an autotools template from scratch, follow the instructions of this presentation, which are abridged here:

  autoscan
  mv configure.scan configure.ac
  # Add this line below the AC_INIT line:
  # AM_INIT_AUTOMAKE
  nano configure.ac
  autoheader
  aclocal
  touch NEWS README AUTHORS ChangeLog
  automake --add-missing --copy
  autoconf

Makefile.am should contain:

  bin_PROGRAMS = testapp
  testapp_SOURCES = testapp.c

Then, to compile, just:

  ./configure
  make

The testapp.tgz file is an example of this. Look at the “autoall” script.

Library + program using libtool

(Download the testlib.tgz example or browse it online)

In this case we have to add a new libtool line to configure.ac, apart from the automake one, under the AC_INIT line:

  AM_INIT_AUTOMAKE
  AC_PROG_LIBTOOL

This is how Makefile.am should look like:

  lib_LTLIBRARIES = libtestlib.la
  libtestlib_la_HEADERS = testlib.h
  libtestlib_la_SOURCES = testlib.c
  libtestlib_ladir = $(includedir)
  libtestlib_la_LDFLAGS = -avoid-version

  bin_PROGRAMS = testapp
  testapp_SOURCES = testapp.c
  testapp_LDADD = .libs/libtestlib.so
  testappdir = $(includedir)

The LDFLAGS are the flags passed to libtool, and are documented here and here in the Autobook reference. In this case, the “-avoid-version” forces generation of libtestlib.so instead of libtestlib.so.0.0.0 (versioned libs aren’t supported in Android).

UPDATE: This “-avoid-version” flag isn’t needed anymore in recent versions of the NDK. They will generate unversioned libraries automatically and won’t recognize the flag (will show an error).

Look at the “autoall” script in the example for all the details. Now it’s fully automatic, so you don’t have to do the insertions by hand in configure.ac.

Androgenized lib + program

(Download the androgenized-testapp.tgz example or browse it online)

All the C code must reside in a directory called “jni”, inside the main directory of the Android project we want to create (in the androgenized-testapp example only the jni is included, technically the other ones aren’t needed):

androgenized-testapp
  src (Java source code)
  libs (compiled binary libs and executables)
  obj (intermediate object code for libs and exes)
  jni
    Application.mk (actually not mandatory)
    Android.mk (generated by androgenizer, drives the compilation when using NDK)
    Makefile.am
    testlib.c
    ...

A new target called Android.mk must be created in Makefile.am:

Android.mk: Makefile.am
        androgenizer -:PROJECT testlib 

        -:REL_TOP $(top_srcdir) -:ABS_TOP $(abs_top_srcdir) 
        -:SHARED testlib 
        -:SOURCES $(libtestlib_la_SOURCES) 
        -:LDFLAGS $(libtestlib_la_LDFLAGS) 

        -:PROJECT testapp 
        -:REL_TOP $(top_srcdir) -:ABS_TOP $(abs_top_srcdir) 
        -:EXECUTABLE testapp 
        -:LDFLAGS -ltestlib 
        -:SOURCES $(testapp_SOURCES) 
> $@

Androgenizer must be downloaded and installed somewhere in our PATH from here. It has a very brief parameter documentation, and the best way to understand it is by seeing usage examples, such as all the androgenizer lines added to the Makefile.am in the GStreamer project.

In the Android.mk target shown above two modules are going to be compiled: “testlib” and “testapp”. Each module is declared with a “-:PROJECT” parameter. The rest of the lines belong to the current project (current module) until a new one is declared. I’ve left a separation between projects to illustrate this.

Next line should always be a “-:REL_TOP” and “-:ABS_TOP”, as recommended in README.txt. These two values are used to check all the paths in LDFLAGS, CFLAGS, etc. and substitute local paths with absolute paths. This is important, because normal makefiles usually assume that the rules are executed from the subdirectory the makefile is in, while what is considered as the working directory for Android.mk makefiles is always the directory from which ndk-build is invoked. As you can imagine, compiler directives such as “-I..” are going to have a very different meaning and cause the wrong behaviour when passed to the compiler by ndk-build.

After that, we indicate the type of target for the project (“-:STATIC” for libtestlib.a, “-:SHARED” for libtestlib.so, and “-:EXECUTABLE” for testapp). The extension of the library/app is automatically calculated.

The “-:SOURCES” parameter is used to indicate the files to be compiled. In this case we can use the list of files already calculated by the previous automake rules (see testlib.tgz and testapp.tgz examples) and stored in the “libtestlib_la_SOURCES” variable.

The “-:LDFLAGS” parameter is used to generate the needed library dependencies for the current module. In the case of testlib, those dependencies are already calculated by automake in the “libtestlib_la_LDFLAGS”. In the case of testapp, it depends on testlib, so we indicate it manually with “-ltestlib”. That will translate into this line in the generated Android.mk file:

  LOCAL_SHARED_LIBRARIES:=libtestlib

this will make the NDK build scripts to link against the proper “libtestlib.so” (if the lib was dynamic) or “libtestlib.a” (if it was static). The NDK already knows how testlib was built and how it has to be linked.

The final “> $@” line just means that make has to take the output of the androgenizer command and dump it to a file named just like the target it’s being build, that is, “Android.mk”.

After all the autoscan, configure.ac customization, autoheader, aclocal, libtoolize, automake and autoconf steps we can “./configure” and “make Android.mk” to generate the “Android.mk” file. Note that no full “make” is needed. Then we step back one directory (“cd ..” to the project root) and perform the actual build using NDK (which has to be downloaded from here, installed and be in our PATH; the version I used to write this post was NDK r8):

  ndk-build V=1

The V=1 option just prints out all the executed commands, which is very handy. The compilation result will be placed in the “libs” directory.

To understand the process a bit more, it’s a good idea to look into the generated Android.mk file:

  LOCAL_PATH:=$(call my-dir)
  include $(CLEAR_VARS)

  LOCAL_MODULE:=testlib
  LOCAL_SRC_FILES := 
          testlib.c
  LOCAL_LDFLAGS:=
          -avoid-version
  LOCAL_PRELINK_MODULE := false
  include $(BUILD_SHARED_LIBRARY)
  include $(CLEAR_VARS)

  LOCAL_MODULE:=testapp
  LOCAL_SRC_FILES := 
          testapp.c
  LOCAL_SHARED_LIBRARIES:=
          libtestlib
  LOCAL_PRELINK_MODULE := false
  include $(BUILD_EXECUTABLE)

Apart from some boilerplate (LOCAL_PATH, CLEAR_VARS, LOCAL_PRELINK_MODULE), we can distinguish the two modules (LOCAL_MODULE), its source files (LOCAL_SRC_FILES), inherited LDFLAGS (LOCAL_LDFLAGS), required libs (LOCAL_SHARED_LIBRARIES) and finally, the building instruction (BUILD_SHARED_LIBRARY, BUILD_EXECUTABLE).

Seeing the Application.mk and Android.mk supported directives are documented somewhere in your installation of the NDK. They support more options than the ones explained here. With this basic introductions, that documentation should be more understandable. Application.mk can be edited directly. Android.mk has to be customized using the “-:PASSTHROUGH” androgenizer parameters in Makefile.am. For example:

  -:PASSTHROUGH LOCAL_ARM_MODE:=arm

Unfortunately, real life autotools build scripts are a bit more complex than the examples shown here. Here are some debug tips that can be helpful:

  • Use “ndk-build V=1” to get the exact command line used to compile each file. When something fails, execute that command line independently and examine all the flags passed to it trying to look for incorrect compiler flags or missing include paths. Try to figure out what the correct command line flags would be.
  • Locate where the offending flags come from in the Android.mk. From there, locate them in the Androgenizer Makefile.am target. Usually some Makefile.am variable has the wrong values. Need to debug more on how Androgenizer is called? Go to the desired directory, delete Android.mk, make Android.mk and see the executed command line.
  • Where the Makefile.am variables comes from? What Makefile.am variables should be used? Examine the generated Makefile to find the values of all possible Makefile.am variables. That’s the place to look to decide what to pass to Androgenizer and what not.

Libertexto 1.0 has been released

After months of collaborative work of a multidisciplinary team directed by Rafael Ibáñez and with the participation of Igalia, version 1.0 of Libertexto project is finally out.

Libertexto is a Mozilla Firefox extension that allows the user to perform typical text comprehension tasks on electronic documents in the same way they’re performed on printed documents. Such tasks include highlighting, annotation, tagging, multimedia content linking, organization and exporting. The extension comes in two flavours: a lightweight version that only supports HTML pages and a full version that also supports PDF documents.

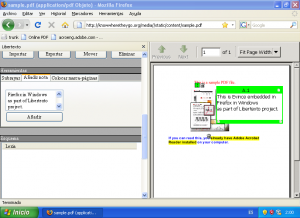
There aren’t many open source tools able to annotate PDF documents out there, so I’m convinced that Libertexto will satisfy a growing demand for this feature. To accomplish the goal, some customizations have been developed on top of Evince 2.28.0 to make it able to communicate with the Firefox extension and to manage the document annotations both in Windows and in GNU/Linux. Evince is embedded into Firefox by a custom plugin that is responsible for launching it and preparing the environment for the window embedding. For the curious readers, more technical details about the embedding process can be found in a previous post about Libertexto.

With this contribution, we expect all the reader community in the Spanish speaking world (the only language available by now) to have a new and powerful tool for text comprehension and commenting. Enjoy it!

UPDATE 7/3/2011:

At some point all the code sould be put together for proper download, but by now it’s scattered among different locations: The source code of the Firefox extension itself can be got by unzipping the XPI file. The source code of the modifications done over Evince can be got from gitorious and the source code of the PDF plugin can be got from here.

UPDATE 3/6/2011:

The new Libertexto 1.1 version is ready for download at libertexto.org. It corrects some compatibility problems with Firefox 4 in Linux, WinXP, Vista and Win7. If it seems that the install doesn’t work directly from the link, just download the file to the desktop and then drag&drop it to Firefox. An experimental version newer than 1.1 is also available in /dev/libertexto/libertexto.xpi. It fixes a bug that prevents the extension to work when the user account name had more than 8 characters, due to a path length limitation in Firefox on Windows.

Meiga 0.4.0 “end of the year” release

I didn’t want to finish the year without devoting some time to Meiga, so I took advantage of Christmas holidays and prepared a new release with some long awaited features that make it a more serious tool:

  • Dynamic port change
  • SSL support
  • Persistent settings storage
  • Password protection

Latest information, including the source code, install instructions and previous versions can be found in the project website: http://meiga.igalia.com

Happy new year!

A practical recipe to enqueue interesting stuff to read in free time

I guess some of you already know about del.icio.us as a very useful tool to organize the random webpages about interesting stuff that you find in the internet while casually browsing.

What I’ve realized today is that Delicious can also offer your bookmarks as an RSS feed and you can take advantage of that feature to keep a TO DO list of websites and articles you’d like to have a look at. It’s simple, just bookmark the interesting pages in Delicious with a “todo” tag and then subscribe to http://feeds.delicious.com/rss/user/todo using your favorite RSS reader.

You’ll have a nice feed ready to be reviewed. The expiration policy of you feed reader will track those pages already reviewed and hide them to you.

Libertexto: integrating Evince into Firefox

These months I’ve been collaborating in Libertexto development. Libertexto, a project coordinated by Rafael Ibáñez, will be a Firefox extension whose goal is to allow the user to do some text comprehension tasks (highlight, add annotations and create bookmarks) and concept mapping tasks (manage a tree of “lexias” or units with semantic content) on HTML and PDF documents.

Multiplatform

So far, I’ve mainly been involved in the task of integrating Evince into Firefox. The goal was not only to provide support for PDF document viewing, but also to adapt Evince to manage the communication with the Firefox extension and to provide the required functionalities and GUI interaction. The fact that Libertexto has to work both in Linux (Ubuntu Jaunty) and Windows made the task more challenging and had an important influence in the design decissions.

libertexto_windows

The plugin

The main idea was to write a plugin registered to visualize documents having the “application/pdf” mime type, using Evince for that, and interact with the XUL/Javascript code to coordinate everything. The npsimple (check my npsimple backup link) example was very valuable to learn how to code a multiplatform basic plugin implementing the Netscape Plugin API (NPAPI). These first testings (with the help of Dependency walker) showed me that the plugin code would only load if compiled with the same compiler used to build Firefox. That means forgetting Cygwin, MinGW32 and other Windows platform free stuff and compile using Visual C++, getting the headers from the Mozilla SDK.

Communications: first try

Once I had a plugin that did nothing, I looked for ways to communicate it with Firefox. I tried some XPCOM examples and debug tools without much luck, so I finally decide to use alternative ways of communication when I needed to.

Compiler restrictions

At this point I focused in compiling Evince for Windows. I chose Evince 2.28.0 because it had been already compiled for Windows by Hib Eris. I found him in the #evince IRC channel and he pointed me to the Ubuntu PPA he had used to cross compile for Windows using MinGW32. He also confirmed to me that mixing MinGW32 compiled apps with MSVC compiled apps is a problem because MinGW32 compilations are dependant on msvcrt.dll, while recent MSVC compilations depend on msvcrt80.dll or msvcrt90.dll. That explains why I couldn’t compile the plugin with the MinGW32 toolchain from Windows. Forget also about converting Evince itself into a plugin (implementing NPAPI), because it won’t load. There’s currently no easy solution, but to compile everything with MSVC (not tried before) or keep applications split.

Embedding the window

After having compiled Evince and all its dependencies for both operating systems I modified the plugin to start Evince each time a new document was loaded. Next step was to find a way to embed Evince in Firefox, because having it as an independent window was not an option. The plugin was given a window ID (XID in X11, HWND in Windows), so I modified Evince to receive it as an extra parameter and use gtk_window_reparent() to “hijack” the window that Firefox provided. Of course, using Mozplugger is much easier, but it’s not supported in Windows, so I had to do it by hand. After some tweaking and having to disable DBUS support to get exactly one process per document (in Linux), it worked in both systems. In Windows I ended up with refresh and focus problems, but I didn’t go further.

Communications: second try

At this point, the key was to have a reliable communication system between Evince and the plugin. DBUS would have been good for Linux, but would bring too much problems in Windows (everything should be installed or work from the Firefox extension bundle and I’d need a way to use DBUS from javascript). Standard IPC methods (eg: shared memory) would be a problem too, because I hadn’t managed to successfully develop XPCOM components that could access low level C functions to use that IPC methods. However, there’s one thing that always work: plain old HTTP requests. They are supported in the Firefox side using XMLHttpRequest and in the Evince side using libsoup-2.4. I had experience using libsoup in Meiga, so it wasn’t difficult for me to set up a bidirectional realtime communication middleware using the AJAX paradigm.

The initial port handshake is a bit tricky, though. Remember that there’s no way for the Firefox extension, the plugin and Evince to talk to each other before this handshake. The process is as follows:

  1. The user opens a URL containing a PDF, so the PDF plugin is invoked. If the plugin is in Linux and detects that libertexto hasn’t been installed in /usr/local/libertexto-0.0.5 yet, it triggers the install script and waits until the process is completed. Then continues.
  2. Using dll/so API calls on the first load, the plugin gets the path where nplibertexto.dll/.so is installed (eg: /home/user/.mozilla/firefox/ky712h81.default/extensions/libertexto-0.0.5@libresoft.es/platform/Linux_x86-gcc3). From that path it gets the extension path (...libertexto-0.0.5@libresoft.es) and builds the xid directory path (...libertexto-0.0.5@libresoft.es/xid)
  3. The plugin gets the URL and the downloaded file name through NPAPI. It then launches Evince (fixed location in Linux, variable location under the extension dir in Windows) with the following parameters: evince --xid 0x6800001 --libertexto-path /home/user/.mozilla/firefox/ky712h81.default/extensions/libertexto-0.0.5@libresoft.es/xid /home/user/local_links.pdf.
  4. Evince opens the file, hijacks the window with handler 0x6800001 and starts a web server on a random port of 127.0.0.1 which will wait for incoming connections. Then the port number is written to a file named 0x6800001 in the xid directory.
  5. The plugin has been waiting up to 5 seconds and monitoring the xid directory for new files. When it finds a new one, reads it and inserts the (xid, process id, MD5 sum of the URL, port) into a children array for further use. Each time the children array changes, the file libertexto-0.0.5@libresoft.es/libertexto-docs is regenerated. That file has the URL MD5 sum and port, one line per document.
  6. The file is available as resource://libertexto-docs/ to the Firefox extension and it’s monitored each 5 seconds using XMLHttpRequest (it can also read local files). That way, the extension keeps a table of open documents and their ports.
  7. Each time the extension detects a new entry in the table, it connects to the port using XMLHttpRequest on a special “receive” URL (eg: http://127.0.0.1:53162/receive) and reads and attends any pending messages that Evince would like to communicate. If there are no more messages, just keeps waiting for one to come. When one comes, the network dispatcher in the Libertexto extension attends it, closes the connection and restarts it to wait again. Evince code just enqueues outgoing messages and writes them when the extension (re)opens the connection.
  8. If it’s the extension who wants to send a message to Evince, a request is made to a “send” url (eg: http://127.0.0.1:53162/send?action=test&param1=value1&param2=value2). There’s also another network dispatcher in Evince that processes incoming messages and calls the corresponding function of EvApplication.
  9. When the document is closed, the plugin code is informed by NPAPI and just ensures that Evince is killed, the 0x6800001 xid file is removed and libertexto-docs is rebuilt.

Packaging

It was time to polish a little bit the building and packaging environment. Different binary sets for different platforms can be provided using the platform directory in the Firefox extension package. In Windows, there’s no problem in relocating a GNOME app where you want, as there’s specific code to locate the data and config dirs, but in Linux it has to be installed in a fixed location, so I prepared a very basic installation script for that platform to be executed by the plugin the first time that the user opens a document.

Functionalities

With the infrastructure ready, I started to hack on Evince and implement the required functionalities (and the related middleware messages in both sides):

  • Get the text directly selected by the user
  • Scroll to a specified position of a specified page in a document
  • Highlight some (preselected) text with the specified color
  • Set an “start of selection” internal mark
  • Set an “end of selection” internal mark and then select the text between the start and the end of selection
  • Show the “create new item” option in the context menu and pass that command to the Firefox extension
  • Overimpress an annotation with some arbitrary text
  • Overimpress some icons that would trigger some commands on the current items

For some of them, specially those related to text highlighting and annotations, the advice from Carlos García Campos was very helpful. Shell, view, document and backend layers, the pixbuf cache, the jobs system… Evince is a big project and I needed some time to get used and understand it, but it has a lot of things to learn. I enjoyed very much this development stage. 🙂

When all the PDF side functionalities were completed, I removed all the unneeded GUI options from Evince and adapted the Libertexto extension panel to produce and handle the required middleware messages needed to manage the user interaction.

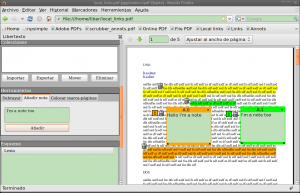
libertexto_linux

The result

Although the project still lacks part of the control and HTML modules functionalities, I got Evince integration working in this nice prototype.

You can download it as: libertexto.xpi (UPDATE 3/3/2011: you might prefer to download the final Libertexto 1.0 version). Please note that this file will probably evolve, being overwritten with newer versions.

Until the whole project gets released, a shapshot of the Evince branch code is published in Gitorious for you to have a look.

Meiga 0.3.3 released

The two main features of this new 0.3.3 release of Meiga are the new redirection support for FON routers (Fonera v1) and memory optimizations for large files, so serving a video file of 1GB won’t eat up all your memory.

Apart from that, some bugs have been solved, the autotools config has been updated (thanks to Javier Jardón), a startup notification has been added (thanks to Rajeesh K Nambiar) and the file size is now passed to the browser, so you’re going to have now a decent progress bar.

As always, you can download it from http://meiga.igalia.com.

Shishen Sho compiled for N900

I’ve recalled about my old Shishen Sho game, originally developed for N810 (Maemo4) and I was wondering if it would compile for N900 (Maemo5). Well, after some minor corrections to make it work in a more recent version of Vala, it compiled. You can downloaded it here:

https://garage.maemo.org/frs/download.php/7573/shishensho_0.3.1-maemo5_armel.deb

Disclaimer: It’s compiled “as is”, with no adaption for sliding menus, no new hardware keys and no new fancy features. It just works and will let you have a good time while waiting for the bus.