During this month I’ve been using my spare time to update my Linux system administration knowlegde, that was a bit outdated. One of the basic things I couldn’t live anymore whithout was usermode linux, so I put myself at work an decided to learn about it.
Next, I’m going to explain the steps taken to put usermode linux working for me. At the end, you will find internet references that would help you in the process.
First step: understanding the concepts
Usermode linux is just a linux kernel that stacks over software kernel calls from the host system to perform its tasks, instead of over real hardware.
Compiling the kernel for the UM architecture
As said in GULIC[1], you have to compile the kernel for a “usermode” special architecture (um), instead of doing it for i386:
cd /usr/src/linux-source-2.6.11

make-kpkg clean

make mrproper ARCH=um

make menuconfig ARCH=um
You won’t see the usual config options. Some of the options seen are special for the UML architecture. You should take care about configuring this options (it’s recommended not to compile them as modules):
- Character Devices: virtual serial line, pty, tty and xterm channel, UML watchdog and Sound support.
- Block Devices: Virtual block device (important).
- UML network devices: virtual network device, ethertap and tun/tap
- Networking support: networking options > (iptables, tunnelling, etc), network device support > universal tun/tap.
- File systems: leave those to be used (ext2, ext3 for example) and Pseudo filesystems > (proc, sys, dev, pts, shm, tmpfs).
- Cryptographic options: only if we use cryptoloop or ipsec.
You can try the “.config” for 2.6.11 Kernel / UML architecture that I’ve used for my tests.
Once configured, you can compile the kernel and generate a Debian package:
make-kpkg --arch=um --revision Usermodelinux.1.0 kernel_image

dpkg -i /usr/src/kernel-uml-2.6.11_Usermodelinux.1.0_i386.deb
The bootstrap system
This package installs the usermode linux as an executable called linux-2.6.11, that can be runned. But before this, and following the instructions from [2], we must generate a filesystem and put into it a bootstrap or basic Debian system to run the UML in:
dd if=/dev/zero of=umlfs bs=1 count=0 seek=2G

mkfs -t ext3 -F umlfs

mkdir rootdir

mount -o loop,rw umlfs rootdir

debootstrap sarge rootdir

umount umlfs
First test
We can boot now the system that we have at this moment, just for a test. As a user, we do:
linux-2.6.11 ubd0=umlfs
And we will see the system booting and all the virtual consoles in 6 xterms. Use one of them to enter as root (no password needed) and you’re in.
One of the first things that you should do is to edit /etc/inittab and comment the lines that spawn the unneeded virtual consoles:
1:2345:respawn:/sbin/getty 38400 tty1

#2:23:respawn:/sbin/getty 38400 tty2

#3:23:respawn:/sbin/getty 38400 tty3

#4:23:respawn:/sbin/getty 38400 tty4

#5:23:respawn:/sbin/getty 38400 tty5

#6:23:respawn:/sbin/getty 38400 tty6
To shutdown the system, simply put “shutdown -h now” and that’s it. If you don’t switch off the system in this way, the UML can hangup and you will have to kill all the linux-2.6.11 processes by hand. You can find more details at [3].
Setting up the network
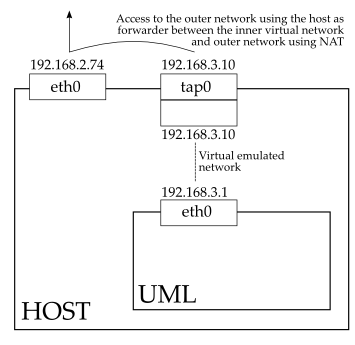
There are some ways in which the UML can communicate with the host and with the external world. The best way, thinking in network security, is to use a tap device. A tap device is a network device that links a real network device (tap0) to a user process, like the UML.
The following image shows the way UML will work using the tap device:

The first step is to create the tap device in the host and enable the final user (enrique) to use it. It’s a persistent device and this action should be done only the first time:
tunctl -u enrique

chown enrique /dev/net/tun

# Also: chmod 666 /dev/net/tun

# but I think that the one above is more secure
This will create the tap0 device. Now it’s time to configure it at host’s /etc/network/interfaces:
iface tap0 inet static

address 192.168.3.10

netmask 255.255.255.0

broadcast 192.168.3.255
And get up the interface: “ifup tap0”. Now it’s time to boot the UML with networking capabilities (as enrique):
linux-2.6.11 ubd0=umlfs eth0=tuntap,tap0
The UML has to be configured in order to use that network. Add this to the /etc/network/interfaces on the UML:
auto eth0

iface eth0 inet static

address 192.168.3.1

netmask 255.255.255.0

gateway 192.168.3.10
And start the net with “ifup eth0”. The UML should be able to ping the tap interface of the host (192.168.3.10), and the host to ping the UML (192.168.3.1). But the UML can’t access to the outer network (192.168.2.0). We must perform some configurations at the host:
echo 1 > /proc/sys/net/ipv4/ip_forward

export EXTERNAL_HOST_IP=192.168.2.74

iptables -t nat -A POSTROUTING -o eth0 -j SNAT --to $EXTERNAL_HOST_IP
Finally, it’s also recommended to add to the UML /etc/resolv.conf the same DNS server configured at the host.
For the repetitive task of creating the tap interface, bringing it up and apply the routing rules, I’ve written a script to set up the host network for a UML environment, that should be run as root. You can find more info about network configuration at [4].
External resources
[1] http://drupal.gulic.org/node/520
[2] http://linuxencaja.symbiosis.com.co/cgi-bin/svnwiki/default/instalando%20debian%20en%20user%20mode%20linux#Obteniendo%20el%20sistema%20base%20de%20Debian
[3] https://www.linux-magazine.es/issue/07/UML.pdf
[4] http://user-mode-linux.sourceforge.net/UserModeLinux-HOWTO-6.html