Developing on WebKitGTK with Qt Creator 4.12.2

After the latest migration of WebKitGTK test bots to use the new SDK based on Flatpak, the old development environment based on jhbuild became deprecated. It can still be used with export WEBKIT_JHBUILD=1, though, but support for this way of working will gradually fade out.

I used to work on a chroot because I love the advantages of having an isolated and self-contained environment, but an issue in the way bubblewrap manages mountpoints basically made it impossible to use the new SDK from a chroot. It was time for me to update my development environment to the new ages and have it working in my main Kubuntu 18.04 distro.

My mail goal was to have a comfortable IDE that follows standard GUI conventions (that is, no emacs nor vim) and has code indexing features that (more or less) work with the WebKit codebase. Qt Creator was providing all that to me in the old chroot environment thanks to some configuration tricks by Alicia, so it should be good for the new one.

I preferred to use the Qt Creator 4.12.2 offline installer for Linux, so I can download exactly the same version in the future in case I need it, but other platforms and versions are also available.

The WebKit source code can be downloaded as always using git:

git clone git.webkit.org/WebKit.git

It’s useful to add WebKit/Tools/Scripts and WebKit/Tools/gtk to your PATH, as well as any other custom tools you may have. You can customize your $HOME/.bashrc for that, but I prefer to have an env.sh environment script to be sourced from the current shell when I want to enter into my development environment (by running webkit). If you’re going to use it too, remember to adjust to your needs the paths used there.

Even if you have a pretty recent distro, it’s still interesting to have the latests Flatpak tools. Add Alex Larsson’s PPA to your apt sources:

sudo add-apt-repository ppa:alexlarsson/flatpak

In order to ensure that your distro has all the packages that webkit requires and to install the WebKit SDK, you have to run these commands (I omit the full path). Downloading the Flatpak modules will take a while, but at least you won’t need to build everything from scratch. You will need to do this again from time to time, every time the WebKit base dependencies change:

install-dependencies
update-webkitgtk-libs

Now just build WebKit and check that MiniBrowser works:

build-webkit --gtk
run-minibrowser --gtk

I have automated the previous steps as go full-rebuild and runtest.sh.

This build process should have generated a WebKit/WebKitBuild/GTK/Release/compile_commands.json
file with the right parameters and paths used to build each compilation unit in the project. This file can be leveraged by Qt Creator to get the right include paths and build flags after some preprocessing to translate the paths that make sense from inside Flatpak to paths that make sense from the perspective of your main distro. I wrote compile_commands.sh to take care of those transformations. It can be run manually or automatically when calling go full-rebuild or go update.

The WebKit way of managing includes is a bit weird. Most of the cpp files include config.h and, only after that, they include the header file related to the cpp file. Those header files depend on defines declared transitively when including config.h, but that file isn’t directly included by the header file. This breaks the intuitive rule of “headers should include any other header they depend on” and, among other things, completely confuse code indexers. So, in order to give the Qt Creator code indexer a hand, the compile_commands.sh script pre-includes WebKit.config for every file and includes config.h from it.

With all the needed pieces in place, it’s time to import the project into Qt Creator. To do that, click File → Open File or Project, and then select the compile_commands.json file that compile_commands.sh should have generated in the WebKit main directory.

Now make sure that Qt Creator has the right plugins enabled in Help → About Plugins…. Specifically: GenericProjectManager, ClangCodeModel, ClassView, CppEditor, CppTools, ClangTools, TextEditor and LanguageClient (more on that later).

With this setup, after a brief initial indexing time, you will have support for features like Switch header/source (F4), Follow symbol under cursor (F2), shading of disabled if-endif blocks, auto variable type resolving and code outline. There are some oddities of compile_commands.json based projects, though. There are no compilation units in that file for header files, so indexing features for them only work sometimes. For instance, you can switch from a method implementation in the cpp file to its declaration in the header file, but not the opposite. Also, you won’t see all the source files under the Projects view, only the compilation units, which are often just a bunch of UnifiedSource-*.cpp files. That’s why I prefer to use the File System view.

Additional features like Open Type Hierarchy (Ctrl+Shift+T) and Find References to Symbol Under Cursor (Ctrl+Shift+U) are only available when a Language Client for Language Server Protocol is configured. Fortunately, the new WebKit SDK comes with the ccls C/C++/Objective-C language server included. To configure it, open Tools → Options… → Language Client and add a new item with the following properties:

  • Name: ccls
  • Language: *.c;.cpp;*.h
  • Startup behaviour: Always On
  • Executable: /home/enrique/work/webkit/WebKit/Tools/Scripts/webkit-flatpak
  • Arguments: --gtk -c ccls --index=/home/enrique/work/webkit/WebKit

Some “LanguageClient ccls: Unexpectedly finished. Restarting in 5 seconds.” errors will appear in the General Messages panel after configuring the language client and every time you launch Qt Creator. It’s just ccls taking its time to index the whole source code. It’s “normal”, don’t worry about it. Things will get stable and start to work after some minutes.

Due to the way the Locator file indexer works in Qt Creator, it can become confused, run out of memory and die if it finds cycles in the project file tree. This is common when using Flatpak and running the MiniBrowser or the tests, since /proc and other large filesystems are accessible from inside WebKit/WebKitBuild. To avoid that, open Tools → Options… → Environment → Locator and set Refresh interval to 0 min.

I also prefer to call my own custom build and run scripts (go and runtest.sh) instead of letting Qt Creator build the project with the default builders and mess everything. To do that, from the Projects mode (Ctrl+5), click on Build & Run → Desktop → Build and edit the build configuration to be like this:

  • Build directory: /home/enrique/work/webkit/WebKit
  • Add build step → Custom process step
    • Command: go (no absolute route because I have it in my PATH)
    • Arguments:
    • Working directory: /home/enrique/work/webkit/WebKit

Then, for Build & Run → Desktop → Run, use these options:

  • Deployment: No deploy steps
  • Run:
    • Run configuration: Custom Executable → Add
      • Executable: runtest.sh
      • Command line arguments:
      • Working directory:

With these configuration you can build the project with Ctrl+B and run it with Ctrl+R.

I think I’m not forgetting anything more regarding environment setup. With the instructions in this post you can end up with a pretty complete IDE. Here’s a screenshot of it working in its full glory:

Anyway, to be honest, nothing will ever reach the level of code indexing features I got with Eclipse some years ago. I could find usages of a variable/attribute and know where it was being read, written or read-written. Unfortunately, that environment stopped working for me long ago, so Qt Creator has been the best I’ve managed to get for a while.

Properly configured web based indexers such as the Searchfox instance configured in Igalia can also be useful alternatives to a local setup, although they lack features such as type hierarchy.

I hope you’ve found this post useful in case you try to setup an environment similar to the one described here. Enjoy!

Attending the GStreamer Conference 2017

This weekend I’ll be in Node5 (Prague) presenting our Media Source Extensions platform implementation work in WebKit using GStreamer.

The Media Source Extensions HTML5 specification allows JavaScript to generate media streams for playback and lets the web page have more control on complex use cases such as adaptive streaming.

My plan for the talk is to start with a brief introduction about the motivation and basic usage of MSE. Next I’ll show a design overview of the WebKit implementation of the spec. Then we’ll go through the iterative evolution of the GStreamer platform-specific parts, as well as its implementation quirks and challenges faced during the development. The talk continues with a demo, some clues about the future work and a final round of questions.

Our recent MSE work has been on desktop WebKitGTK+ (the WebKit version powering the Epiphany, aka: GNOME Web), but we also have MSE working on WPE and optimized for a Raspberry Pi 2. We will be showing it in the Igalia booth, in case you want to see it working live.

I’ll be also attending the GStreamer Hackfest the days before. There I plan to work on webm support in MSE, focusing on any issue in the Matroska demuxer or the vp9/opus/vorbis decoders breaking our use cases.

See you there!

UPDATE 2017-10-22:

The talk slides are available at https://eocanha.org/talks/gstconf2017/gstconf-2017-mse.pdf and the video is available at https://gstconf.ubicast.tv/videos/media-source-extension-on-webkit (the rest of the talks here).

Media Source Extensions upstreaming, from WPE to WebKitGTK+

A lot of good things have happened to the Media Source Extensions support since my last post, almost a year ago.

The most important piece of news is that the code upstreaming has kept going forward at a slow, but steady pace. The amount of code Igalia had to port was pretty big. Calvaris (my favourite reviewer) and I considered that the regular review tools in WebKit bugzilla were not going to be enough for a good exhaustive review. Instead, we did a pre-review in GitHub using a pull request on my own repository. It was an interesting experience, because the change set was so large that it had to be (artificially) divided in smaller commits just to avoid reaching GitHub diff display limits.

394 GitHub comments later, the patches were mature enough to be submitted to bugzilla as child bugs of Bug 157314 – [GStreamer][MSE] Complete backend rework. After some comments more in bugzilla, they were finally committed during Web Engines Hackfest 2016:

Some unforeseen regressions in the layout tests appeared, but after a couple of commits more, all the mediasource WebKit tests were passing. There are also some other tests imported from W3C, but I kept them still skipped because webm support was needed for many of them. I’ll focus again on that set of tests at its due time.

Igalia is proud of having brought the MSE support up to date to WebKitGTK+. Eventually, this will improve the browser video experience for a lot of users using Epiphany and other web browsers based on that library. Here’s how it enables the usage of YouTube TV at 1080p@30fps on desktop Linux:

Our future roadmap includes bugfixing and webm/vp9+opus support. This support is important for users from countries enforcing patents on H.264. The current implementation can’t be included in distros such as Fedora for that reason.

As mentioned before, part of this upstreaming work happened during Web Engines Hackfest 2016. I’d like to thank our sponsors for having made this hackfest possible, as well as Metrological for giving upstreaming the importance it deserves.

Thank you for reading.


Improving Media Source Extensions on WebKit ports based on GStreamer

During 2014 I started to become interested on how GStreamer was used in WebKit to play media content and how it was related to Media Source Extensions (MSE). Along 2015, my company Igalia strenghtened its cooperation with Metrological to enhance the multimedia support in their customized version of WebKitForWayland, the web platform they use for their products for the set-top box market. This was an opportunity to do really interesting things in the multimedia field on a really nice hardware platform: Raspberry Pi.

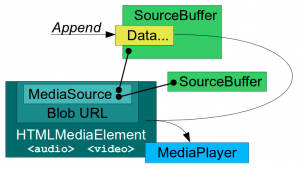
What are Media Source Extensions?

Normal URL playback in the <video> tag works by configuring the platform player (GStreamer in our case) with a source HTTP URL, so it behaves much like any other external player, downloading the content and showing it in a window. Special cases such as Dynamic Adaptive Streaming over HTTP (DASH) are automatically handled by the player, which becomes more complex. At the same time, the JavaScript code in the webpage has no way to know what’s happening with the quality changes in the stream.

The MSE specification lets the authors move the responsibility to the JavaScript side in that kind of scenarios. A Blob object (Blob URL) can be configured to get its data from a MediaSource object. The MediaSource object can instantiate SourceBuffer objects. Video and Audio elements in the webpage can be configured with those Blob URLs. With this setup, JavaScript can manually feed binary data to the player by appending it to the SourceBuffer objects. The data is buffered and the playback time ranges generated by the data are accessible to JavaScript. The web page (and not the player) has now the control on the data being buffered, its quality, codec and procedence.  Now it’s even possible to synthesize the media data programmatically if needed, opening the door to media editors and media effects coded in JavaScript.

mse1

MSE is being adopted by the main content broadcasters on the Internet. It’s required by YouTube for its dedicated interface for TV-like devices and they even have an MSE conformance test suite that hardware manufacturers wanting to get certified for that platform must pass.

MSE architecture in WebKit

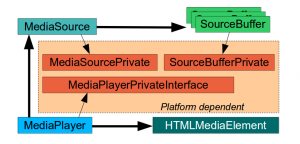
WebKit is a multiplatform framework with an end user API layer (WebKit2), an internal layer common to all platforms (WebCore) and particular implementations for each platform (GObject + GStreamer, in our case). Google and Apple have done a great work bringing MSE to WebKit. They have led the effort to implement the common WebCore abstractions needed to support MSE, such as MediaSource, SourceBuffer, MediaPlayer and the integration with HTMLMediaElement (video tag). They have also provided generic platform interfaces (MediaPlayerPrivateInterface, MediaSourcePrivate, SourceBufferPrivate) a working platform implementation for Mac OS X and a mock platform for testing.

mse2

The main contributions to the platform implementation for ports using GStreamer for media playback were done by Stephane Jadaud and Sebastian Dröge on bugs #99065 (initial implementation with hardcoded SourceBuffers for audio and video), #139441 (multiple SourceBuffers) and #140078 (support for tracks, more containers and encoding formats). This last patch hasn’t still been merged in trunk, but I used it as the starting point of the work to be done.

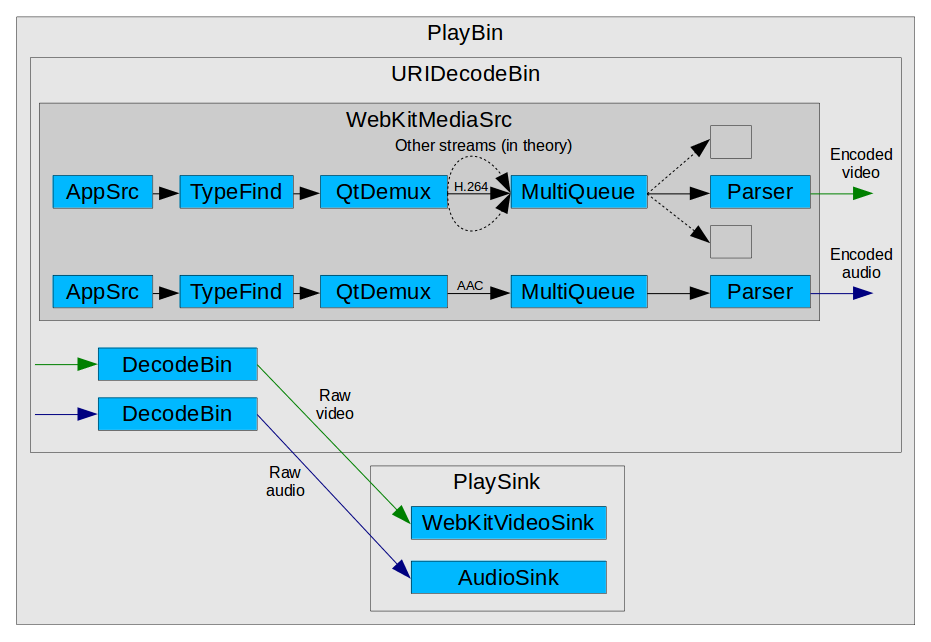
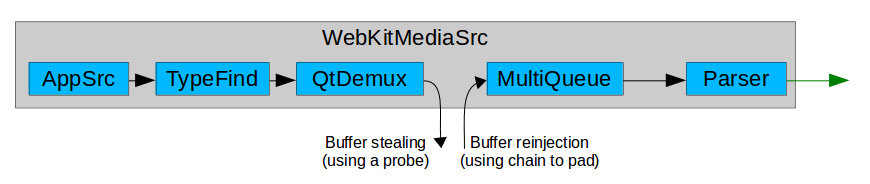
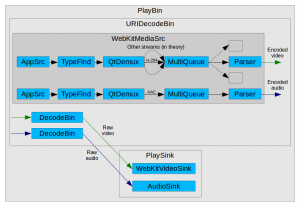
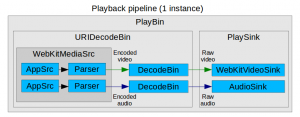
GStreamer, unlike other media frameworks, is strongly based on the concept of pipeline: the data traverses a series of linked elements (sources, demuxers, decoders, sinks) which process it in stages. At a given point in time, different pieces of data are in the pipeline at the same time in varying degrees of processing stages. In the case of MSE, a special WebKitMediaSrc GStreamer element is used as the data source in the pipeline and also serves as interface with the upper MSE layer, acting as client of MediaSource and SourceBuffer. WebKitMediaSrc is spawned by GstPlayBin (a container which manages everything automatically inside) when an MSE SourceBuffer is added to the MediaSource. The MediaSource is linked with the MediaPlayer, which has MediaPlayerPrivateGStreamer as private platform implementation. In the design we were using at that time, WebKitMediaSrc was responsible for demuxing the data appended on each SourceBuffer into several streams (I’ve never seen more than one stream per SourceBuffer, though) and for reporting the statistics and the samples themselves to the upper layer according to the MSE specs. To do that, the WebKitMediaSrc encapsulated an appsrc, a demuxer and a parser per source. The remaining pipeline elements after WebKitMediaSrc were in charge of decoding and playback.

Processing appends with GStreamer

The MSE implementation in Chromium uses a chunk demuxer to parse (demux) the data appended to the SourceBuffers. It keeps the parsing state and provides a self-contained way to perform the demuxing. Reusing that Chromium code would have been the easiest solution. However, GStreamer is a powerful media framework and we strongly believe that the demuxing stage can be done using GStreamer as part of the pipeline.

Because of the way GStreamer works, it’s easy to know when an element outputs new data but there’s no easy way to know when it has finished processing its input without discontinuing the flow with with End Of Stream (EOS) and effectively resetting the element. One simple approach that works is to use timeouts. If the demuxer doesn’t produce any output after a given time, we consider that the append has produced all the MediaSamples it could and therefore has finished. Two different timeouts were used: one to detect when appends that produce no samples have finished (noDataToDecodeTimeout) and another to detect when no more samples are coming (lastSampleToDecodeTimeout). The former needs to be longer than the latter.

Another technical challenge was to perform append processing when the pipeline isn’t playing. While playback doesn’t start, the pipeline just prerolls (is filled with the available data until the first frame can be rendered on the screen) and then pauses there until the continuous playback can start. However, the MSE spec expects the appended data to be completely processed and delivered to the upper MSE layer first, and then it’s up to JavaScript to decide if the playback on screen must start or not. The solution was to add intermediate queue elements with a very big capacity to force a preroll stage long enough for the probes in the demuxer source (output) pads to “see” all the samples pass beyond the demuxer. This was how the pipeline looked like at that time (see also the full dump):

mse3

While focusing on making the YouTube 2015 tests pass on our Raspberry Pi 1, we realized that the generated buffered ranges had strange micro-holes (eg: [0, 4.9998]; [5.0003, 10.0]) and that was confusing the tests. Definitely, there were differences of interpretation between ChunkDemuxer and qtdemux, but this is a minor problem which can be solved by adding some extra time ranges that fill the holes. All these changes got the append feature in good shape and the we could start watching videos more or less reliably on YouTube TV for the first time.

Basic seek support

Let’s focus on some real use case for a moment. The JavaScript code can be appending video data in the [20, 25] range, audio data in the [30, 35] range (because the [20, 30] range was appended before) and we’re still playing the [0, 5] range. Our previous design let the media buffers leave the demuxer and enter in the decoder without control. This worked nice for sequential playback, but was not compatible with non-linear playback (seeks). Feeding the decoder with video data for [0, 5] plus [20, 25] causes a big pause (while the timeline traverses [5, 20]) followed by a bunch of decoding errors (the decoder needs sequential data to work).

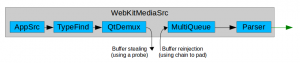
One possible improvement to support non-linear playback is to implement buffer stealing and buffer reinjecting at the demuxer output, so the buffers never go past that point without control. A probe steals the buffers, encapsulates them inside MediaSamples, pumps them to the upper MSE layer for storage and range reporting, and finally drops them at the GStreamer level. The buffers can be later reinjected by the enqueueSample() method when JavaScript decides to start the playback in the target position. The flushAndEnqueueNonDisplayingSamples() method reinjects auxiliary samples from before the target position just to help keeping the decoder sane and with the right internal state when the useful samples are inserted. You can see the dropping and reinjection points in the updated diagram:

mse4

The synchronization issues of managing several independent timelines at once must also be had into account. Each of the ongoing append and playback operations happen in their own timeline, but the pipeline is designed to be configured for a common playback segment. The playback state (READY, PAUSED, PLAYING), the flushes needed by the seek operation and the prerolls also affect all the pipeline elements. This problem can be minimized by manipulating the segments by hand to accomodate the different timings and by getting the help of very large queues to sustain the processing in the demuxer, even when the pipeline is still in pause. These changes can solve the issues and get the “47. Seek” test working, but YouTube TV is more demanding and requires a more structured design.

Divide and conquer

At this point we decided to simplify MediaPlayerPrivateGStreamer and refactor all the MSE logic into a new subclass called MediaPlayerPrivateGStreamerMSE. After that, the unified pipeline was split into N append pipelines (one per SourceBuffer) and one playback pipeline. This change solved the synchronization issues and splitted a complex problem into two simpler ones. The AppendPipeline class, visible only to the MSE private player, is in charge of managing all the append logic. There’s one instance for each of the N append pipelines.

Each append pipeline is created by hand. It contains an appsrc (to feed data into it), a typefinder, a qtdemuxer, optionally a decoder (in case we want to suport Encrypted Media Extensions too), and an appsink (to pick parsed data). In my willing to simplify, I removed the support for all formats except ISO MP4, the only one really needed for YouTube. The other containers could be reintroduced in the future.

mse5

The playback pipeline is what remains of the old unified pipeline, but simpler. It’s still based on playbin, and the main difference is that the WebKitMediaSrc is now simpler. It consists of N sources (one per SourceBuffer) composed by an appsrc (to feed buffered samples), a parser block and the src pads. Uridecodebin is in charge of instantiating it, like before. The PlaybackPipeline class was created to take care of some of the management logic.

mse6

The AppendPipeline class manages the callback forwarding between threads, using asserts to strongly enforce the access to WebCore MSE classes from the main thread. AtomicString and all the classes inheriting from RefCounted (instead of ThreadSafeRefCounted) can’t be safely managed from different threads. This includes most of the classes used in the MSE implementation. However, the demuxer probes and other callbacks sometimes happen in the streaming thread of the corresponding element, not in the main thread, so that’s why call forwarding must be done.

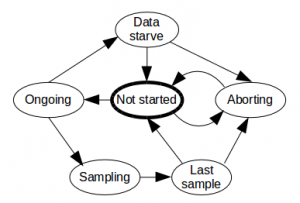
AppendPipeline also uses an internal state machine to manage the different stages of the append operation and all the actions relevant for each stage (starting/stopping the timeouts, process the samples, finish the appends and manage SourceBuffer aborts).

mse7

Seek support for the real world

With this new design, the use case of a typical seek works like this (very simplified):

  1. The video may be being currently played at some position (buffered, of course).
  2. The JavaScript code appends data for the new target position to each of the video/audio SourceBuffers. Each AppendPipeline processes the data and JavaScript is aware of the new buffered ranges.
  3. JavaScript seeks to the new position. This ends up calling the seek() and doSeek() methods.
  4. MediaPlayerPrivateGStreamerMSE instructs WebKitMediaSrc to stop accepting more samples until further notice and to prepare the seek (reset the seek-data and need-data counters). The player private performs the real GStreamer seek in the playback pipeline and leaves the rest of the seek pending for when WebKitMediaSrc is ready.
  5. The GStreamer seek causes some changes in the pipeline and eventually all the appsrc in WebKitMediaSrc emit the seek-data and need-data events. Then WebKitMediaSrc notifies the player private that it’s ready to accept samples for the target position and needs data. MediaSource is notified here to seek and this triggers the enqueuing of the new data (non displaying samples and visible ones).
  6. The pending seek at player private level which was pending from step 4 continues, giving permission to WebKitMediaSrc to accept samples again.
  7. Seek is completed. The samples enqueued in step 5 flow now through the playback pipeline and the user can see the video from the target position.

That was just the typical case, but more complex scenarios are also supported. This includes multiple seeks (pressing the forward/backward button several times), seeks to buffered areas (the easiest ones) and to unbuffered areas (where the seek sequence needs to wait until the data for the target area is appended and buffered).

Close cooperation from qtdemux is also required in order to get accurate presentation timestamps (PTS) for the processed media. We detected a special case when appending data much forward in the media stream during a seek. Qtdemux kept generating sequential presentation timestamps, completely ignoring the TFDT atom, which tells where the timestamps of the new data block must start. I had to add a new “always-honor-tfdt” attribute to qtdemux to solve that problem.

With all these changes the YouTube 2015 and 2016 tests are green for us and YouTube TV is completely functional on a Raspberry Pi 2.

Upstreaming the code during Web Engines Hackfest 2015

All this work is currently in the Metrological WebKitForWayland repository, but it could be a great upstream contribution. Last December I was invited to the Web Engines Hackfest 2015, an event hosted in Igalia premises in A Coruña (Spain). I attended with the intention of starting the upstreaming process of our MSE implementation for GStreamer, so other ports such as WebKitGTK+ and WebKitEFL could also benefit from it. Thanks a lot to our sponsors for making it possible.

At the end of the hackfest I managed to have something that builds in a private branch. I’m currently devoting some time to work on the regressions in the YouTube 2016 tests, clean unrelated EME stuff and adapt the code to the style guidelines. Eventually, I’m going to submit the patch for review on bugzilla. There are some topics that I’d like to discuss with other engineers as part of this process, such as the interpretation of the spec regarding how the ReadyState is computed.

In parallel to the upstreaming process, our plans for the future include getting rid of the append timeouts by finding a better alternative, improving append performance and testing seek even more thoroughly with other real use cases. In the long term we should add support for appendStream() and increase the set of supported media containers and codecs at least to webm and vp8.

Let’s keep hacking!

Hacking on Chromium for Android from Eclipse (part 3)

In the previous posts we learnt how to code and debug Chromium for Android C++ code from Eclipse. In this post I’m going to explain how to open the ChromeShell Java code, so that you will be able to hack on it like you would in a normal Android app project. Remember, you will need to install the ADT plugin in Eclipse  and the full featured adb which comes with the standalone SDK from the official pageDon’t try to reuse the android sdk in “third_party/android_tools/sdk”.

Creating the Java project in Eclipse

Follow these instructions to create the Java project for ChromeShell (for instance):

  • File, New, Project…, Android, Android project from existing code
  • Choose “src/chrome/android/shell/java” as project root, because there’s where the AndroidManifest.xml is. Don’t copy anything to the workspace.
  • The project will have a lot of unmet package dependencies. You have to manually import some jars:
    • Right click on the project, Properties, Java build path, Libraries, Add external Jars…
    • Then browse to “src/out/Debug/lib.java” (assuming a debug build) and import these jars (use CTRL+click for multiple selection in the file chooser):
      • base_java.jar, chrome_java.jar, content_java.jar, dom_distiller_core_java.jar, guava_javalib.jar,
      • jsr_305_javalib.jar, net_java.jar, printing_java.jar, sync_java.jar, ui_java.jar, web_contents_delegate_android.jar
    • If you keep having problems, go to “lib.java”, run this script and find in which jar is the class you’re missing:
for i in *.jar; do echo "--- $i ---------------------"; unzip -l $i; done | most
  • The generated resources directory “gen” produced by Eclipse is going to lack a lot of stuff.
    • It’s better to make it point to the “right” gen directory used by the native build scripts.
    • Delete the “gen” directory in “src/chrome/android/shell/java” and make a symbolic link:
ln -s ../../../../out/Debug/chrome_shell_apk/gen .
    • If you ever “clean project” by mistake, delete the chrome_shell_apk/gen directory and regenerate it using the standard ninja build command
  • The same for the “res” directory. From “src/chrome/android/shell/java”, do this (and ignore the errors):
cp -sr $PWD/../res ./
cp -sr $PWD/../../java/res ./
  • I haven’t been able to solve the problem of integrating all the string definitions. A lot of string related errors will appear in files under “res”. By the moment, just ignore those errors.
  • Remember to use a fresh standalone sdk. Install support for Android 4.4.2. Also, you will probably need to modify the project properties to match the same 4.4.2 version you have support for.

And that’s all. Now you can use all the Java code indexing features of Eclipse. By the moment, you still need to build and install to the device using the command line recipe, though:

 ninja -C out/Debug chrome_shell_apk
 build/android/adb_install_apk.py --apk ChromeShell.apk --debug

Debugging Java code

To debug the Java side of the app running in the device, follow the same approach that you would if you had a normal Java Android app:

  • Launch the ChromeShell app manually from the device.
  • In Eclipse, use the DDMS perspective to locate the org.chromium.chrome.shell process. Select it in the Devices panel and connect the debugger using the “light green bug” icon (not to be mistaken with the normal debug icon available from the other perspectives).
  • Change to the Debug perspective and set breakpoints as usual.

Enjoy!

chromium_android_eclipse_java

Hacking on Chromium for Android from Eclipse (part 2)

In the previous post, I showed all the references to get the Chromium for Android source code, setup Eclipse and build the ChromeShell app. Today I’m going to explain how to debug that app running in the device.

Debugging from command line

This is the first step that we must ensure to have working before trying to debug directly from Eclipse. The steps are explained in the debugging-on-android howto, but I’m showing them here for reference.

Perform the “build Chrome shell” steps but using debug parameters:

 ninja -C out/Debug chrome_shell_apk
 build/android/adb_install_apk.py --apk ChromeShell.apk --debug

To avoid the need of having a rooted Android device, setup ChromeShell as the app to be debugged going to Android Settings, Debugging in your device. Now, to launch a gdb debugging session from a console:

 cd ~/ANDROID/src
 . build/android/envsetup.sh
 ./build/android/adb_gdb_chrome_shell --start

You will see that the adb_gdb script called by adb_gdb_chrome_shell pulls some libraries from your device to /tmp. If everything goes fine, gdb shouldn’t have any problem finding all the symbols of the source code. If not, please check your setup again before trying to debug in Eclipse.

Debugging from Eclipse

Ok, this is going to be hacky. Hold on your hat!

Eclipse can’t use adb_gdb_chrome_shell and adb_gdb “as is”, because they don’t allow gdb command line parameters. We must create some wrappers in $HOME/ANDROID, our working dir. This means “/home/enrique/ANDROID/” for me. The wrappers are:

Wrapper 1: adb_gdb

This is a copy of  ~/ANDROID/src/build/android/adb_gdb with some modifications. It calculates the same as the original, but doesn’t launch gdb. Instead, it creates two symbolic links in ~/ANDROID:

  • gdb is a link to the arm-linux-androideabi-gdb command used internally.
  • gdb.init is a link to the temporary gdb config file created internally.

These two files will make the life simpler for Eclipse. After that, the script prints the actual gdb command that it would have executed (but has not), and reads a line waiting for ENTER. After the user presses ENTER, it just kills everything. Here are the modifications that you have to do to the original adb_gdb you’ve copied. Note that my $HOME (~) is “/home/enrique”:

 # In the begining:
 CHROMIUM_SRC=/home/enrique/ANDROID/src
 ...
 # At the end:
 log "Launching gdb client: $GDB $GDB_ARGS -x $COMMANDS"

 rm /home/enrique/ANDROID/gdb
 ln -s "$GDB" /home/enrique/ANDROID/gdb
 rm /home/enrique/ANDROID/gdb.init
 ln -s "$COMMANDS" /home/enrique/ANDROID/gdb.init
 echo
 echo "---------------------------"
 echo "$GDB $GDB_ARGS -x $COMMANDS"
 read

 exit 0
 $GDB $GDB_ARGS -x $COMMANDS &&
 rm -f "$GDBSERVER_PIDFILE"

Wrapper 2: adb_gdb_chrome_shell

It’s a copy of ~/ANDROID/src/build/android/adb_gdb_chrome_shell with a simple modification in PROGDIR:

 PROGDIR=/home/enrique/ANDROID

Wrapper 3: gdbwrapper.sh

Loads envsetup, returns the gdb version for Eclipse if asked, and invokes adb_gdb_chrome_shell. This is the script to be run in the console before starting the debug session in Eclipse. It will invoke the other scripts and wait for ENTER.

 #!/bin/bash
 cd /home/enrique/ANDROID/src
 . build/android/envsetup.sh
 if [ "X$1" = "X--version" ]
 then
  exec /home/enrique/ANDROID/src/third_party/android_tools/ndk/toolchains/arm-linux-androideabi-4.8/prebuilt/linux-x86_64/bin/arm-linux-androideabi-gdb --version
  exit 0
 fi
 exec ../adb_gdb_chrome_shell --start --debug
 #exec ./build/android/adb_gdb_chrome_shell --start --debug

Setting up Eclipse to connect to the wrapper

Now, the Eclipse part. From the “Run, Debug configurations” screen, create a new “C/C++ Application” configuration with these features:

  • Name: ChromiumAndroid 1 (name it as you wish)
  • Main:
    • C/C++ Application: /home/enrique/ANDROID/src/out/Debug/chrome_shell_apk/libs/armeabi-v7a/libchromeshell.so
    • IMPORTANT: From time to time, libchromeshell.so gets corrupted and is truncated to zero size. You must regenerate it by doing:

rm -rf /home/enrique/ANDROID/src/out/Debug/chrome_shell_apk
ninja -C out/Debug chrome_shell_apk

    • Project: ChromiumAndroid (the name of your project)
    • Build config: Use active
    • Uncheck “Select config using C/C++ Application”
    • Disable auto build
    • Connect process IO to a terminal
  • IMPORTANT: Change “Using GDB (DSF) Create Process Launcher” and use “Legacy Create Process Launcher” instead. This will enable “gdb/mi” and allow us to set the timeouts to connect to gdb.
  • Arguments: No changes
  • Environment: No changes
  • Debugger:
    • Debugger: gdb/mi
    • Uncheck “Stop on startup at”
    • Main:
      • GDB debugger: /home/enrique/ANDROID/gdb (IMPORTANT!)
      • GDB command file: /home/enrique/ANDROID/gdb.init (IMPORANT!)
      • GDB command set: Standard (Linux)
      • Protocol: mi2
      • Uncheck: “Verbose console”
      • Check: “Use full file path to set breakpoints”
    • Shared libs:
      • Check: Load shared lib symbols automatically
  • Source: Use the default values without modification (absolute file path, program relative file path, ChromiumAndroid (your project name)).
  • Refresh: Uncheck “Refresh resources upon completion”
  • Common: No changes.

When you have everything: apply (to save), close and reopen.

Running a debug session

Now, run gdbwrapper.sh in an independent console. When it pauses and starts waiting for ENTER, change to Eclipse, press the Debug button and wait for Eclipse to attach to the debugger. The execution will briefly pause in an ioctl() call and then continue.

To test that the debugging session is really working, set a breakpoint in content/browser/renderer_host/render_message_filter.cc, at content::RenderMessageFilter::OnMessageReceived and continue the execution. It should break there. Now, from the Debug perspective, you should be able to see the stacktrace and access to the local variables.

Welcome to the wonderful world of Android native code debugging from Eclipse! It’s a bit slow, though.

This completes the C++ side of this series of posts. In the next post, I will explain how to open the Java code of ChromeShellActivity, so that you will be able to hack on it like you would in a normal Android app project.

chromium_android_eclipse

Hacking on Chromium for Android from Eclipse (part 1)

In the Chromium Developers website has some excellent resources on how to setup an environment to build Chromium for Linux desktop and for Android. There’s also a detailed guide on how to setup Eclipse as your development environment, enabling you to take advantage of code indexing and enjoy features such as type hierarchy, call hierarchy, macro expansion, references and a lot of tools much better than the poor man’s trick of grepping the code.

Unfortunately, there are some integration aspects not covered by those guides, so joining all the dots is not a smooth task. In this series of posts, I’m going to explain the missing parts to setup a working environment to code and debug Chromium for Android from Eclipse, both C++ and Java code. All the steps and commands from this series of posts have been tested in an Ubuntu Saucy chroot. See my previous post on how to setup a chroot if you want to know how to do this.

Get the source code

See the get-the-code guide. Don’t try to reconvert a normal Desktop build into an Android build. It just doesn’t work. The detailed steps to get the code from scratch and prepare the dependencies are the following:

 cd ANDROID # Or the directory you want
 fetch --nohooks android --nosvn=True
 cd src
 git checkout master
 build/install-build-deps.sh
 build/install-build-deps-android.sh
 gclient sync --nohooks

Configure and generate the project (see AndroidBuildInstructions), from src:

 # Make sure that ANDROID/.gclient has this line:
 # target_os = [u'android']
 # And ANDROID/chromium.gyp_env has this line:
 # { 'GYP_DEFINES': 'OS=android', }
 gclient runhooks

Build Chrome shell, from src:

 # This builds
 ninja -C out/Release chrome_shell_apk
 # This installs in the device
 # Remember the usual stuff to use a new device with adb:
 # http://developer.android.com/tools/device.html 
 # http://developer.android.com/tools/help/adb.html#Enabling
 # Ensure that you can adb shell into the device
 build/android/adb_install_apk.py --apk ChromeShell.apk --release

If you ever need to update the source code, follow this recipe and use Release or Debug at your convenience:

 git pull origin master
 gclient sync
 # ninja -C out/Release chrome_shell_apk
 ninja -C out/Debug chrome_shell_apk
 # build/android/adb_install_apk.py --apk ChromeShell.apk --release
 build/android/adb_install_apk.py --apk ChromeShell.apk --debug

As a curiosity, it’s worth to mention that adb is installed on third_party/android_tools/sdk/platform-tools/adb.

Configure Eclipse

To configure Eclipse, follow the instructions in LinuxEclipseDev. They work nice with Eclipse Kepler.

In order to open and debug the Java code properly, it’s also interesting to install the ADT plugin in Eclipse too. Don’t try to reuse the Android SDK in “third_party/android_tools/sdk”. It seems to lack some things. Download a fresh standalone SDK from the official page instead and tell the ADT plugin to use it.

In the next post, I will explain how to debug C++ code running in the device, both from the command line and from Eclipse.

chromium_android_eclipse_cpp

Using schroot to have a stable and transplantable development environment

Over the last months I’ve been working in several projects, switched laptop and reinstalled my main distribution several times. Having to replicate the development environment one time after another and reinstall the compiler, tools, editor and all sorts of dependencies that stain a desktop distribution is a major nuisance. In the worst case, things won’t work as before due to incompatibilities of the new distribution. And what about bringing new developers to a complex project with a lot of dependencies which are difficult to track? The new team member can spend days trying to replicate the development environment of the rest of the team.

Fortunately, I learnt to use a tool that solves all these problems: schroot. Now I have one chroot for each of the main projects I work on. I can “transplant” it from one distribution or computer to the next, give it to a newcoming developer so that they can start hacking in the project in minutes, or just archive it when I’m not in the project anymore. It’s true that I’m spending more disk space with this approach but, from my point of view, the advantages are worth. Moreover, working in this way you start from a “bare” distribution and if your project build system is forgetting some dependency (because it “should” be on a desktop distribution) you will notice.

Making it work on a Debian based distribution is as easy as:

sudo apt-get install schroot

After that, you have to initialize the chroot(s) to use. Each chroot can be based on their own distribution. For instance, to create one chroot based on Ubuntu Quantal 64 bit to hack on webkit (so, named after it), you have to initialize it using debootstrap:

sudo debootstrap --arch amd64 quantal /srv/chroot/webkit http://archive.ubuntu.com/ubuntu/

Then you have to configure schroot to find it by editing /etc/schroot/schroot.conf and adding the new entry. There are a several flavours to configure chroots, but my favourite one is directory-based:

[webkit]
description=Quantal for compiling Webkit
type=directory
directory=/srv/chroot/webkit
users=enrique
groups=root
root-groups=root

If you want to have an independent home dir in the chroot, comment out the corresponding line in /etc/schroot/default/fstab (and probably in desktop/fstab too). If you’re going to use WebKit2, you need to enable (uncomment) shared memory support. The resulting fstab should look like this:

/proc           /proc           none    rw,bind         0       0
/sys            /sys            none    rw,bind         0       0
/dev            /dev            none    rw,bind         0       0
/dev/pts        /dev/pts        none    rw,bind         0       0
#/home          /home           none    rw,bind         0       0
/tmp            /tmp            none    rw,bind         0       0
#/run           /run            none    rw,bind         0       0
#/run/lock      /run/lock       none    rw,bind         0       0
/dev/shm        /dev/shm        none    rw,bind         0       0
/run/shm        /run/shm        none    rw,bind         0       0

Now, to enter in the chroot:

schroot -c webkit

Schroot has an automatic session management system that allows creating, reusing and killing sessions but which can be a bit uncomfortable at the begining. If you find yourself with a lot of zombie sessions, just kill them all:

schroot -e --all-sessions

As I’ve got tired of automatic and zombie sessions, now I use a tiny webkit.sh script in $HOME/bin to create, reuse and kill them on demand. Feel free to customize it for your needs if you find it useful.

For more info, here are the original sources I used to learn about schroot:

UPDATE: 2014-02-03

If you want to enjoy graphics acceleration (and probably other features), the chroot needs to have the same acceleration packages than the host. In my case (Nvidia card), I needed this in the chroot to avoid a big black rectangle while running Chromium/Blink:

apt-get install nvidia-319

UPDATE: 2015-01-08

If you want to use pulseaudio in the chroot, add these paths to /etc/schroot/default/fstab (my user is “enrique”, with UID 1000, use your owns):

/var/lib/dbus /var/lib/dbus none rw,bind 0 0
/home/enrique/.config/pulse /home/enrique/.config/pulse none rw,bind 0 0
# On other distros: /home/enrique/.pulse /home/enrique/.pulse none rw,bind 0 0
/run/user/1000 /run/user/1000 none rw,bind 0 0

From source code to ndk-build using autotools and androgenizer

This post explains how to compile C source code for Android using the Native Development Kit (NDK) by using autotools to set up the building infrastructure and using androgenizer to convert that autotools infrastructure into Android.mk files understood by the ndk-build tool. I’ll first review some autotools concepts very quickly trough examples and iterate over them.

Simple program

(Download the testapp.tgz example or browse it online)

We start from a simple helloworld program with its main() function that depends on a sayhello() function. We want to compile it using autotools in the simplest possible way.

To create an autotools template from scratch, follow the instructions of this presentation, which are abridged here:

  autoscan
  mv configure.scan configure.ac
  # Add this line below the AC_INIT line:
  # AM_INIT_AUTOMAKE
  nano configure.ac
  autoheader
  aclocal
  touch NEWS README AUTHORS ChangeLog
  automake --add-missing --copy
  autoconf

Makefile.am should contain:

  bin_PROGRAMS = testapp
  testapp_SOURCES = testapp.c

Then, to compile, just:

  ./configure
  make

The testapp.tgz file is an example of this. Look at the “autoall” script.

Library + program using libtool

(Download the testlib.tgz example or browse it online)

In this case we have to add a new libtool line to configure.ac, apart from the automake one, under the AC_INIT line:

  AM_INIT_AUTOMAKE
  AC_PROG_LIBTOOL

This is how Makefile.am should look like:

  lib_LTLIBRARIES = libtestlib.la
  libtestlib_la_HEADERS = testlib.h
  libtestlib_la_SOURCES = testlib.c
  libtestlib_ladir = $(includedir)
  libtestlib_la_LDFLAGS = -avoid-version

  bin_PROGRAMS = testapp
  testapp_SOURCES = testapp.c
  testapp_LDADD = .libs/libtestlib.so
  testappdir = $(includedir)

The LDFLAGS are the flags passed to libtool, and are documented here and here in the Autobook reference. In this case, the “-avoid-version” forces generation of libtestlib.so instead of libtestlib.so.0.0.0 (versioned libs aren’t supported in Android).

UPDATE: This “-avoid-version” flag isn’t needed anymore in recent versions of the NDK. They will generate unversioned libraries automatically and won’t recognize the flag (will show an error).

Look at the “autoall” script in the example for all the details. Now it’s fully automatic, so you don’t have to do the insertions by hand in configure.ac.

Androgenized lib + program

(Download the androgenized-testapp.tgz example or browse it online)

All the C code must reside in a directory called “jni”, inside the main directory of the Android project we want to create (in the androgenized-testapp example only the jni is included, technically the other ones aren’t needed):

androgenized-testapp
  src (Java source code)
  libs (compiled binary libs and executables)
  obj (intermediate object code for libs and exes)
  jni
    Application.mk (actually not mandatory)
    Android.mk (generated by androgenizer, drives the compilation when using NDK)
    Makefile.am
    testlib.c
    ...

A new target called Android.mk must be created in Makefile.am:

Android.mk: Makefile.am
        androgenizer -:PROJECT testlib 

        -:REL_TOP $(top_srcdir) -:ABS_TOP $(abs_top_srcdir) 
        -:SHARED testlib 
        -:SOURCES $(libtestlib_la_SOURCES) 
        -:LDFLAGS $(libtestlib_la_LDFLAGS) 

        -:PROJECT testapp 
        -:REL_TOP $(top_srcdir) -:ABS_TOP $(abs_top_srcdir) 
        -:EXECUTABLE testapp 
        -:LDFLAGS -ltestlib 
        -:SOURCES $(testapp_SOURCES) 
> $@

Androgenizer must be downloaded and installed somewhere in our PATH from here. It has a very brief parameter documentation, and the best way to understand it is by seeing usage examples, such as all the androgenizer lines added to the Makefile.am in the GStreamer project.

In the Android.mk target shown above two modules are going to be compiled: “testlib” and “testapp”. Each module is declared with a “-:PROJECT” parameter. The rest of the lines belong to the current project (current module) until a new one is declared. I’ve left a separation between projects to illustrate this.

Next line should always be a “-:REL_TOP” and “-:ABS_TOP”, as recommended in README.txt. These two values are used to check all the paths in LDFLAGS, CFLAGS, etc. and substitute local paths with absolute paths. This is important, because normal makefiles usually assume that the rules are executed from the subdirectory the makefile is in, while what is considered as the working directory for Android.mk makefiles is always the directory from which ndk-build is invoked. As you can imagine, compiler directives such as “-I..” are going to have a very different meaning and cause the wrong behaviour when passed to the compiler by ndk-build.

After that, we indicate the type of target for the project (“-:STATIC” for libtestlib.a, “-:SHARED” for libtestlib.so, and “-:EXECUTABLE” for testapp). The extension of the library/app is automatically calculated.

The “-:SOURCES” parameter is used to indicate the files to be compiled. In this case we can use the list of files already calculated by the previous automake rules (see testlib.tgz and testapp.tgz examples) and stored in the “libtestlib_la_SOURCES” variable.

The “-:LDFLAGS” parameter is used to generate the needed library dependencies for the current module. In the case of testlib, those dependencies are already calculated by automake in the “libtestlib_la_LDFLAGS”. In the case of testapp, it depends on testlib, so we indicate it manually with “-ltestlib”. That will translate into this line in the generated Android.mk file:

  LOCAL_SHARED_LIBRARIES:=libtestlib

this will make the NDK build scripts to link against the proper “libtestlib.so” (if the lib was dynamic) or “libtestlib.a” (if it was static). The NDK already knows how testlib was built and how it has to be linked.

The final “> $@” line just means that make has to take the output of the androgenizer command and dump it to a file named just like the target it’s being build, that is, “Android.mk”.

After all the autoscan, configure.ac customization, autoheader, aclocal, libtoolize, automake and autoconf steps we can “./configure” and “make Android.mk” to generate the “Android.mk” file. Note that no full “make” is needed. Then we step back one directory (“cd ..” to the project root) and perform the actual build using NDK (which has to be downloaded from here, installed and be in our PATH; the version I used to write this post was NDK r8):

  ndk-build V=1

The V=1 option just prints out all the executed commands, which is very handy. The compilation result will be placed in the “libs” directory.

To understand the process a bit more, it’s a good idea to look into the generated Android.mk file:

  LOCAL_PATH:=$(call my-dir)
  include $(CLEAR_VARS)

  LOCAL_MODULE:=testlib
  LOCAL_SRC_FILES := 
          testlib.c
  LOCAL_LDFLAGS:=
          -avoid-version
  LOCAL_PRELINK_MODULE := false
  include $(BUILD_SHARED_LIBRARY)
  include $(CLEAR_VARS)

  LOCAL_MODULE:=testapp
  LOCAL_SRC_FILES := 
          testapp.c
  LOCAL_SHARED_LIBRARIES:=
          libtestlib
  LOCAL_PRELINK_MODULE := false
  include $(BUILD_EXECUTABLE)

Apart from some boilerplate (LOCAL_PATH, CLEAR_VARS, LOCAL_PRELINK_MODULE), we can distinguish the two modules (LOCAL_MODULE), its source files (LOCAL_SRC_FILES), inherited LDFLAGS (LOCAL_LDFLAGS), required libs (LOCAL_SHARED_LIBRARIES) and finally, the building instruction (BUILD_SHARED_LIBRARY, BUILD_EXECUTABLE).

Seeing the Application.mk and Android.mk supported directives are documented somewhere in your installation of the NDK. They support more options than the ones explained here. With this basic introductions, that documentation should be more understandable. Application.mk can be edited directly. Android.mk has to be customized using the “-:PASSTHROUGH” androgenizer parameters in Makefile.am. For example:

  -:PASSTHROUGH LOCAL_ARM_MODE:=arm

Unfortunately, real life autotools build scripts are a bit more complex than the examples shown here. Here are some debug tips that can be helpful:

  • Use “ndk-build V=1” to get the exact command line used to compile each file. When something fails, execute that command line independently and examine all the flags passed to it trying to look for incorrect compiler flags or missing include paths. Try to figure out what the correct command line flags would be.
  • Locate where the offending flags come from in the Android.mk. From there, locate them in the Androgenizer Makefile.am target. Usually some Makefile.am variable has the wrong values. Need to debug more on how Androgenizer is called? Go to the desired directory, delete Android.mk, make Android.mk and see the executed command line.
  • Where the Makefile.am variables comes from? What Makefile.am variables should be used? Examine the generated Makefile to find the values of all possible Makefile.am variables. That’s the place to look to decide what to pass to Androgenizer and what not.

Libertexto 1.0 has been released

After months of collaborative work of a multidisciplinary team directed by Rafael Ibáñez and with the participation of Igalia, version 1.0 of Libertexto project is finally out.

Libertexto is a Mozilla Firefox extension that allows the user to perform typical text comprehension tasks on electronic documents in the same way they’re performed on printed documents. Such tasks include highlighting, annotation, tagging, multimedia content linking, organization and exporting. The extension comes in two flavours: a lightweight version that only supports HTML pages and a full version that also supports PDF documents.

There aren’t many open source tools able to annotate PDF documents out there, so I’m convinced that Libertexto will satisfy a growing demand for this feature. To accomplish the goal, some customizations have been developed on top of Evince 2.28.0 to make it able to communicate with the Firefox extension and to manage the document annotations both in Windows and in GNU/Linux. Evince is embedded into Firefox by a custom plugin that is responsible for launching it and preparing the environment for the window embedding. For the curious readers, more technical details about the embedding process can be found in a previous post about Libertexto.

With this contribution, we expect all the reader community in the Spanish speaking world (the only language available by now) to have a new and powerful tool for text comprehension and commenting. Enjoy it!

UPDATE 7/3/2011:

At some point all the code sould be put together for proper download, but by now it’s scattered among different locations: The source code of the Firefox extension itself can be got by unzipping the XPI file. The source code of the modifications done over Evince can be got from gitorious and the source code of the PDF plugin can be got from here.

UPDATE 3/6/2011:

The new Libertexto 1.1 version is ready for download at libertexto.org. It corrects some compatibility problems with Firefox 4 in Linux, WinXP, Vista and Win7. If it seems that the install doesn’t work directly from the link, just download the file to the desktop and then drag&drop it to Firefox. An experimental version newer than 1.1 is also available in /dev/libertexto/libertexto.xpi. It fixes a bug that prevents the extension to work when the user account name had more than 8 characters, due to a path length limitation in Firefox on Windows.